
作者| 李秋键
出品 |AI科技大本营(ID:rgznai100)


parser = argparse.ArgumentParser(description='Action Recognition by OpenPose')parser.add_argument('--video', help='Path to video file.')args = parser.parse_args()# 导入相关模型estimator = load_pretrain_model('VGG_origin')# 参数初始化realtime_fps = '0.0000'start_time = time.time()fps_interval = 1fps_count = 0run_timer = 0frame_count = 0# 读写视频文件cap =cv.VideoCapture("2.mp4")#video_writer = set_video_writer(cap, write_fps=int(7.0))# 保存关节数据的txt文件,用于训练过程(for training)f = open('origin_data.txt', 'a+')num=0while cv.waitKey(1) < 0:has_frame, show = cap.read()if has_frame:fps_count += 1frame_count += 1# pose estimationhumans = estimator.inference(show)# get pose infopose = TfPoseVisualizer.draw_pose_rgb(show, humans) # return frame, joints, bboxes, xcenter#video_writer.write(show)if len(pose[-1])==36:num+=1print(num)# 采集数据,用于训练过程(for training)joints_norm_per_frame = np.array(pose[-1]).astype(np.str)f.write(' '.join(joints_norm_per_frame))f.write('\n')cv.imshow("tets",show)cv.waitKey(1)else:breakcap.release()f.close()
2.2 数据处理
通过对数据观察发现,由于拍摄的视频遮挡较多,部分肢体提取为0会较大的影响模型效果,这里将这几个部位去除。代码如下:
f=open('origin_data.txt')text=f.read()f.close()datasets=[]text=text.split("\n")for i in text:temp=i.split(" ")temp1=[]state=Truefor j in range(len(temp)):try:temp1.append(float(temp[j]))except:passif len(temp1) == 36:temp1.pop(28)temp1.pop(28)temp1.pop(30)temp1.pop(30)for t in temp1:if t==0.:state=Falseif state:datasets.append(temp1)flap=30#x_data = datasets[:-1-flap]y_data=datasets[flap:-1]n=len(x_data)
2.3 LSTM模型搭建和训练
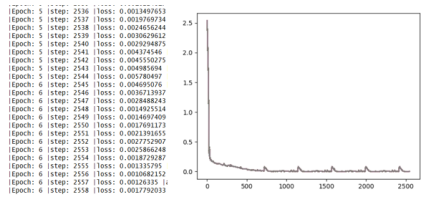
这里设置LSTM层神经元64,设置损失函数为为MSE误差函数,优化器为adam优化器,迭代次数为100轮,并将其损失图动态绘制。代码如下:
times=[]losss=[]nums=0Epoch=100correct=0for k in range(Epoch):for i in range(n):x_np=np.array(x_data[i],dtype='float32')#此时x的维度为1维y_np=np.array(y_data[i],dtype='float32')#需要把x维度扩充到三个维度,[batch,time_step,input_size]x=variable(torch.from_numpy(x_np[np.newaxis,:,np.newaxis]))y=variable(torch.from_numpy(y_np[np.newaxis,:,np.newaxis]))prediction=rnn(x)if prediction.flatten().data.numpy().any==y.flatten().data.numpy().any:correct+=1loss=loss_func(prediction,y)optim.zero_grad()loss.backward()optim.step()nums += 1accuracy=float(correct/nums)print("|Epoch:",k,"|step:",nums,"|loss:",loss.data.numpy(),"|accuracy:%.4f"%accuracy)times.append(nums)losss.append(float(loss.data))plt.plot(times,losss)plt.pause(0.05)
2.4 模型可视化
根据预测出的骨骼坐标,定义基本骨骼连接方法和颜色,同时这里还要考虑到已经去除的骨骼,最终代码如下:
import cv2def draw(test):back=cv2.imread("back.jpg")image_h, image_w ,c= back.shapecenters = {}CocoColors = [[255, 0, 0], [255, 85, 0], [255, 170, 0], [255, 255, 0], [170, 255, 0], [85, 255, 0], [0, 255, 0],[0, 255, 85], [0, 255, 170], [0, 255, 255], [0, 170, 255], [0, 85, 255], [0, 0, 255], [85, 0, 255],[170, 0, 255], [255, 0, 255], [255, 0, 170], [255, 0, 85], [255, 0, 85]]CocoPairs = [(1, 2), (1, 5), (2, 3), (3, 4), (5, 6), (6, 7), (1, 8), (8, 9), (9, 10), (1, 11),(11, 12), (12, 13), (1, 0), (0, 14), (14, 15), (5, 15)]#修改了for pos in range(0,16):center = (int((test[2*pos] * (image_w//2) + 0.5)), int((test[2*pos+1] * (image_h//2) )))centers[pos] = centercv2.circle(back, center, 3, CocoColors[pos], thickness=3, lineType=8, shift=0)for pair_order, pair in enumerate(CocoPairs):cv2.line(back, centers[pair[0]], centers[pair[1]], CocoColors[pair_order], 3)

完整代码:
李秋键,CSDN博客专家,CSDN达人课作者。硕士在读于中国矿业大学,开发有taptap竞赛获奖等。

全面解析Kmeans聚类算法
商汤科技上市,开启AI新篇章
2021年有用的数据清洗python库
这个AI模型火上GitHub热榜

分享

点收藏

点点赞

点在看


请登录之后再进行评论